How-to-construct a composter
August 25, 2010
Greetings all!
Today’s post is a continuation of yesterdays and details exactly how Phil built us a composter out of post-industrial materials. Enjoy!
… After we gathered our composter materials and the needed tools and amenities, we started talking through the concept…
After conversing, Phil thought that it would be cool if we had two compartments for our composter because, as alluded to yesterday, this allows us to have different batches of material based on how long the material has been “composting.” Also, in having two compartments for the composter, we can play mad scientist with the bio-based resins we have sampled and see how they do in fact break down, and if so, over what kind of time frame. As discussed in a previous post, we have some concern about bio-based resins breaking down completely i.e. being completely consumed by the microorganisms present in the disposal environment. If bio-based resins do not completely break down, then we walk the risk of introducing a ton of teeny tiny plastic particulates into the environment, which could travel into our waterways, be consumed by tiny things that get consumed by bigger things and on it goes until humans are ingesting tiny bits of plastic. Yuck! The fancy term is “bioaccumulation” and it is no good.
Where was I going…oh yea: so while we won’t be able to tell, obviously, if the bio-based material breaks down completely because we don’t have insane microscopic vision, we will be able to watch the degredation process in real time, which I think is pretty neato! In theory, the second compartment could be devoted entirely to watching different bio-based resins breakdown; the remaining compost, therefore, would not be used on our farm next spring because the risk that it may contain plastic particulates. Perhaps we could even send this compost to a “lab” to determine if the plastic particulates have in fact been entirely consumed…imagine the possibilities!
Please note, however, than most bio-based resins are certified to breakdown in an industrial composting facility, which is much more sophisticated than our composter. Therefore, I am unsure if most of these materials, certified with the ASTM D6400 Standard for Industrial Compostability, will break down at all, as our composter resembles more of a home composter than an industrial one. We did, on the other hand, just sample a new bio-based resin, which has received certification for “OK to home Compost.” This stuff is definitely going in our mighty composter to see how it breaks down!
And, how cool is this, but when we decide to start playing mad scientist, I will take pictures of the degredation process over time so you can see how a converted package morphs and breaks down in the disposal environment in which it is intended for. Splendid!
Alright, let’s continue with our how-to construct a composter:
So yeah, we decided on two compartments.
Then Phil suggested that we add some kind of mechanism, which would allow us to access the compost pile without having Go Go Gadget arms. After all, the composter is over 4 feet tall, which would make access to the material difficult as would it make “tending” to the compost problematic. Phil came up with another solution: why not add a tracked, wooden component to one side of the composter, which would then receive a thin piece of wood that you could move up and down along the track! Sort of like a curtain, this wood veil could be easily manipulated by the person tending to the compost, moving it up to access the mix and moving it down to conceal the pile from critters and excessive wind, rain, sun, etc.
So that was the approach Phil took toward constructing our compost: two compartments with a retractable side wall built out of post-industrial wood pallets.
Once we were all in agreement, Phil began working on “piratizing” our pallets. This consisted of him breaking down the pallets with a pry-bar in hopes of gathering enough material to carry out his vision.
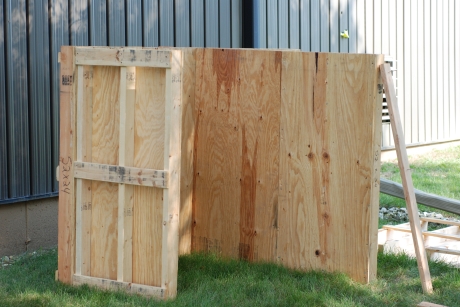
Basically, Phil intended on have two pallets per side of the composter, with a “divider” that cut the area of the composter in half, thereby creating two compartments. In order to accomplish this he began by attaching two skids together via a drill and nails. See:
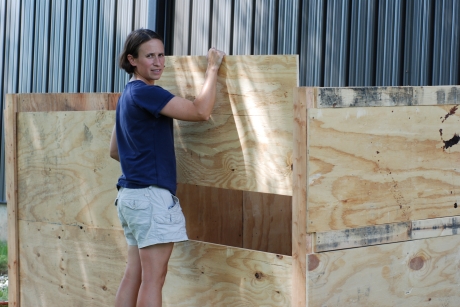
After assembling one side of the composter, Phil repeated this process and created another side wall. He then attached these together, creating an “L” form.
Prior to calling it a day, Phil attached one pallet to the newly constructed “L,” which would serve as the divider between the other compartment, yet to be created. Check it out:
The next day, Phil finished the divider wall by attaching another skid, and created the entire second compartment. Check out the skid organization:
He also designed and constructed our “opening mechanism,” illustrated here:
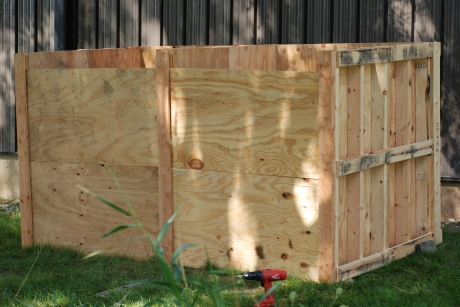
And TA DA, we have a fully functioning and arguably adorable composter; I’m so proud:
I can’t wait to paint it! I’m thinking polka dots!
Tune in tomorrow to learn about oxo-degradables and other biodedradable plastics.


Definately a very informative website on composting. I can tell that you’re truely passionate about the environment and spreading ideas that will help us all live more sustainably. I just started a business that sells compost bins via the internet. I hope that composting will one day become as commonplace as recycling has become. Check out my website if you get the chance. http://www.greencompostbins.com Great job guys!